
How to Use SurgeGraph For Automated Content Writing
Writing content is a tedious process that requires painstaking time, effort, and money. Unfortunately, there’s no escaping it. If you want traffic to your website, you NEED to publish content.
The good news is that with SurgeGraph’s Longform AI, writing content doesn’t have to be time-consuming nor expensive.
Longform AI is an AI writing tool that automates content writing so you can get a high-quality, SEO-optimized long-form content done in minutes.
Read this article to learn how to use SurgeGraph’s Longform AI to automate content writing and easily publish more content at lightning speed.
Why SurgeGraph?
So, why use SurgeGraph instead of any other AI writing tool?
Here’s a few advantages of using SurgeGraph:
-
Offers in-depth customization: AI content performs best when there is human intervention. SurgeGraph offers many customization options so that you get an output that is tailored to your requirements and specifications.
-
Data-driven: SurgeGraph harnesses a total of 51 data points from the SERP to generate your content. This ensures you get the best chances of ranking within the top 10.
-
SEO optimization: SurgeGraph has a suite of SEO features and tools to ensure your content is SEO-ready to dominate the rankings.
-
Continuous updates: Being flexible is our mantra at SurgeGraph. We listen to your feedback and regularly roll out new features, updates, and improvements to provide you with the best user experience.
Next, we'll go over how to automatically generate content using SurgeGraph.
Step 1: Create Document
The first step is creating your document.
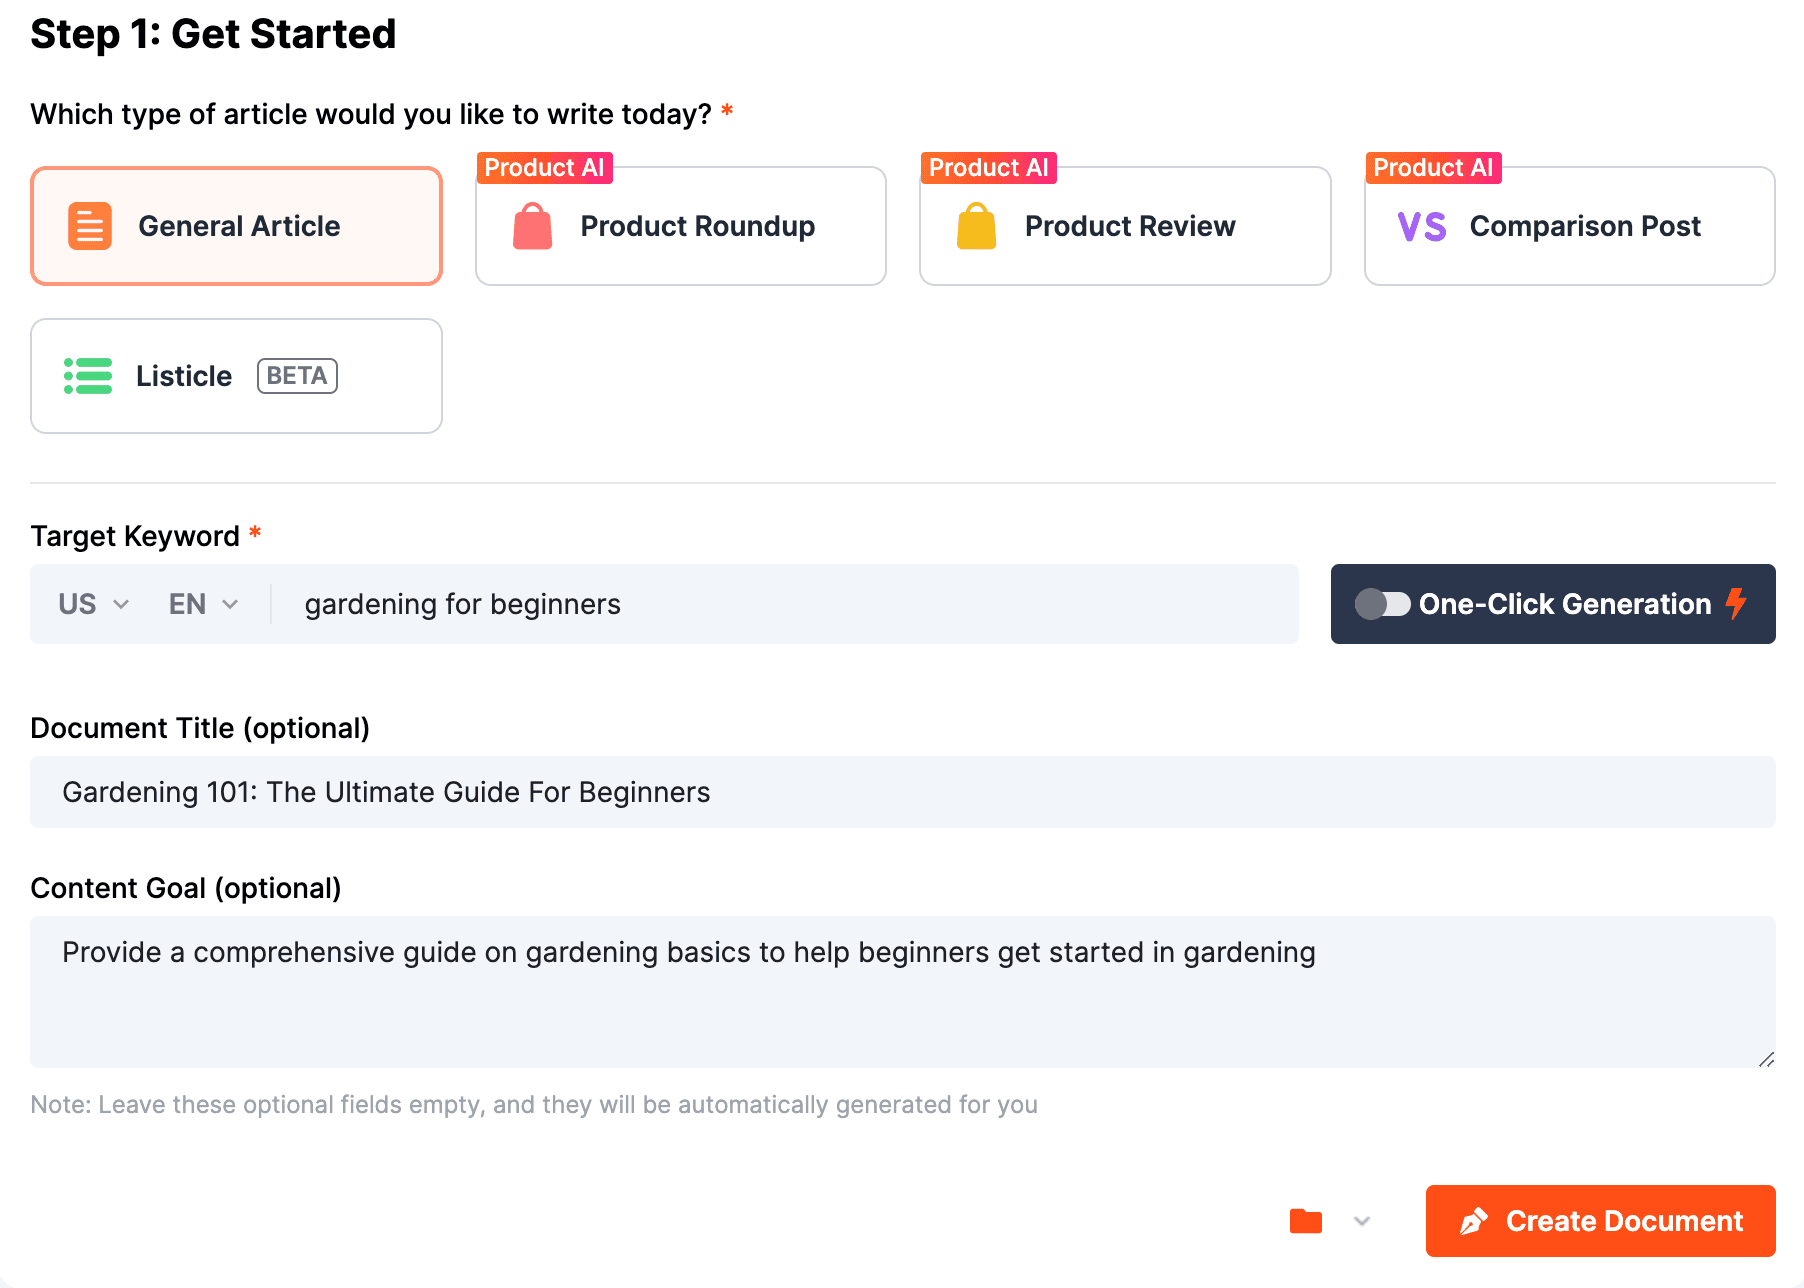
Start by choosing the article type. Each type comes with its own set of automated steps and customization, so make sure to choose the right one.
Here’s a brief description of each article type to help you choose the right one:
-
General: A comprehensive piece on a specific topic.
-
Product Roundup: An overview of multiple products in the same category.
-
Product Review: An in-depth review of a single product.
-
Comparison Post: An evaluation of two or three similar products.
-
Listicle: An article structured as a list of items.
Next, insert a target keyword – the search query you wish to rank for. You can use a keyword research tool like SurgeGraph’s for inspiration and vital keyword data.
The next two fields (Document Title & Content Goal) are optional, but specifying them helps in narrowing down the focus of the article. This also helps in getting better intent-matching content.
In the Document Title field, insert the title of your article or blog post.
In the Content Goal section, specify what you envision the content to be about – its purpose and objective. What do you want the reader to achieve from reading your article?
See the image below for a sample target keyword, title, and content goals for a general article type.
Step 2: Generate Outline
The next step is generating your outline. To get the best outline, make sure to review and adjust the settings below:
-
Content Length
First, choose your desired content length.
If you can’t decide, click on “SERP Settings” to look at the word count of the top ranking pages, and then aim for the same range.
Note: While Longform AI will try its best to adhere to your chosen word count, the final output will ultimately depend on various things, such as the number of headings, the length of your outline, the word count of the SERP’s top pages, and the complexity of the topic.
-
SERP Settings
SERP Settings allow you choose which high ranking pages you want to influence your content.
By default, SurgeGraph will try to incorporate topics, keywords, links, and questions commonly found on the top-ranking pages, but some pages might not be relevant to your desired output. Some pages may even be of poor quality.
Hence, you can exclude such pages to prevent low-quality or irrelevant pages from influencing your content.
After finalizing your SERP settings, make sure to hit the “Save Changes” button to apply the changes.

-
Custom Outline
Toggle the Custom Outline option if you want to use your own outline instead of SurgeGraph’s generated outline.
Note that this field only accepts input of the headings (H2, H3, and H4). The next step will allow you to input more information in the outline.

-
Point of View
The Point of View (POV) setting is the perspective the content is written from, whether it’s first-person, second-person, or third-person.
This setting highly depends on your preferences and style, so we suggest experimenting with different POVs to see which one suits you best.
Or if you simply don’t want to think about it, just leave it at Auto, and Longform AI will choose for you.
-
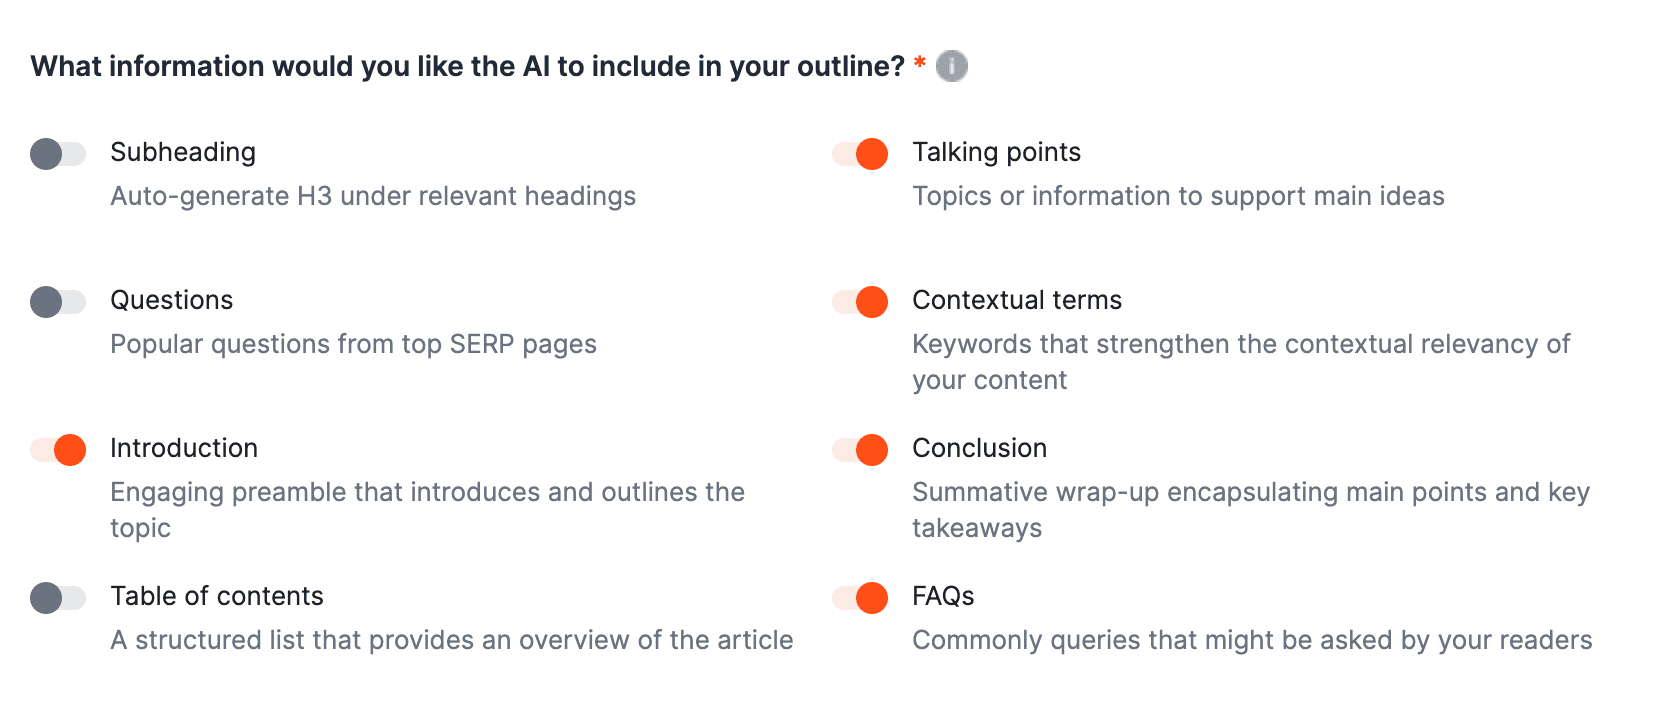
Outline Information
You can also toggle off any extra details you do not wish to be automatically generated in your outline.
Note that even if you exclude an element at this step, you can still auto-generate it in the next step.
-
Generate Customized Outline
If, for any reason, you prefer your outline to not be influenced by the top pages on the SERP, check the “Generate customized outline” box. By doing this, Longform AI ignores the top ranking pages and generates a completely customized outline from scratch.
We suggest checking this box especially if you’ve specified some content goals. This ensures the output adheres to your content goal better. Otherwise, Longform AI will be highly influenced by topics covered by the pages on the SERP’s top 10.

Step 3: Edit Outline
The next steps involves reviewing and customizing your outline.
We highly recommend you to invest some time in this step, because it helps you get a final output that matches your requirements better.
Many users have also shared that they get the best output when they spend time in perfecting the outline.
There are various ways you can customize the outline:
-
Add, remove, or edit headings
The headings are completely customizable, meaning you can add new headings, remove some, edit them, or even rearrange the order.
To add a new heading, you can either add topics covered by top pages on the SERP from the right panel, or add your own heading.
Once you add a new heading, you can click Autofill to automatically fill in the information like talking points.
Pro tip: Collapse the headings to make it easier to drag and drop the headings and rearrange the order.
-
Add tables, bullet lists, Key Takeaways
You know what they say: it’s not what you say, it's how you say it.
For information that are better presented in the form of tables and bullet lists, make sure to take advantage of them to increase reader engagement and readability.
Also, consider adding a Key Takeaways section to cater to readers who prefer getting the gist of your content straight up.
-
Customize the introduction section
The introduction section may be short, but it can make or break your content – a reader takes one glance at your introduction to decide whether to continue reading or bounce back to the SERP.
So, make sure to customize the introduction section with your own input to improve reader engagement and entice them to read the rest of your content.
-
Add or edit FAQ
Having an FAQ section in your articles are a great way to boost user experience.
Although you may leave the FAQ section empty to have it auto-generated for you, you also have the option to list your own questions.
This is especially useful if you can anticipate and know exactly what questions readers need answers to.
-
Use Context Infuser
As said previously, the best way to succeed with AI-generated content is to have human intervention.
And the best way to achieve this is by using Context Infuser (click on the graduation cap icon in a heading section to show the input field).
Context Infuser allows you to incorporate information the AI does not know about, like current events, background knowledge, and most importantly – your expert insights.

-
SERP Facts
AI writers are notoriously known for their tendency to hallucinate and make things up.
To counter this from happening, use SERP facts to boost the factual accuracy of your content.
SERP facts are facts retrieved from authority pages on the SERP, which means you have a treasure trove of real-time facts at your fingertips.
On the right panel, head to the SERP facts tab to easily add facts to your outline.
-
Add topics, questions, links from SERP
The best way to steal your competitor’s spot is to be better than them. And to do that, you want to apply their winning strategies to your content (but make it better, of course).
Lucky for you, these winning strategies are served on a silver platter for you. Head to the right panel, where you’ll find top topics, burning questions, and authority links found on the top-ranking pages ready to be used.
Simply add them to your outline if you want those information to be included in your content.
Step 4: Generate & Enhance Content
Once you’re happy with the outline, click “Start Writing” to start generating the content. If needed, you may adjust the settings before generating.
After your content is done being generated, make sure to thoroughly review it. As with all AI writers, this is important to ensure there’s no mistakes or inaccuracies.
If you find specific sections that you don’t like, you can use the writing assistance features like Rewrite, Simplify, or Expand to tweak any text.
You can also use Expert Command for more customized instructions.
Simply highlight a specific text, hit Expert Command, and enter your instructions. You can also use it on a new line by hitting the shortcut key, “/”.

Next, consider adding images to up your visual game (no one likes reading a wall of text, after all).
For extra convenience, you can use SurgeGraph’s in-app image generator, Content Vision.
To use Content Vision, click on the image icon on the toolbar and hit AI Gallery. Then enter simple text prompts, choose your settings, and hit Generate.

Step 5: Optimize On-Page SEO
The next step is optimizing for on-page SEO. This is crucial to ensure search engines understand your content and want to rank it high.
Here are a few ways to optimize your on-page SEO using SurgeGraph:
-
Look at your SEO score analysis
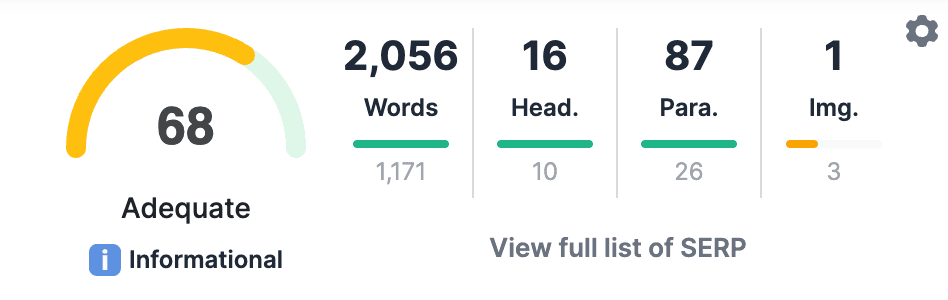
SurgeGraph evaluates your content based on important on-page SEO metrics and scores it on a 0-100 scale. The better optimized your content is, the higher your SEO score.
Note that your content doesn’t have to be perfectly optimized to 100 (there’s no such thing anyway). Instead, aim for a score within the well-optimized range.
To boost your SEO score, follow the steps below.
-
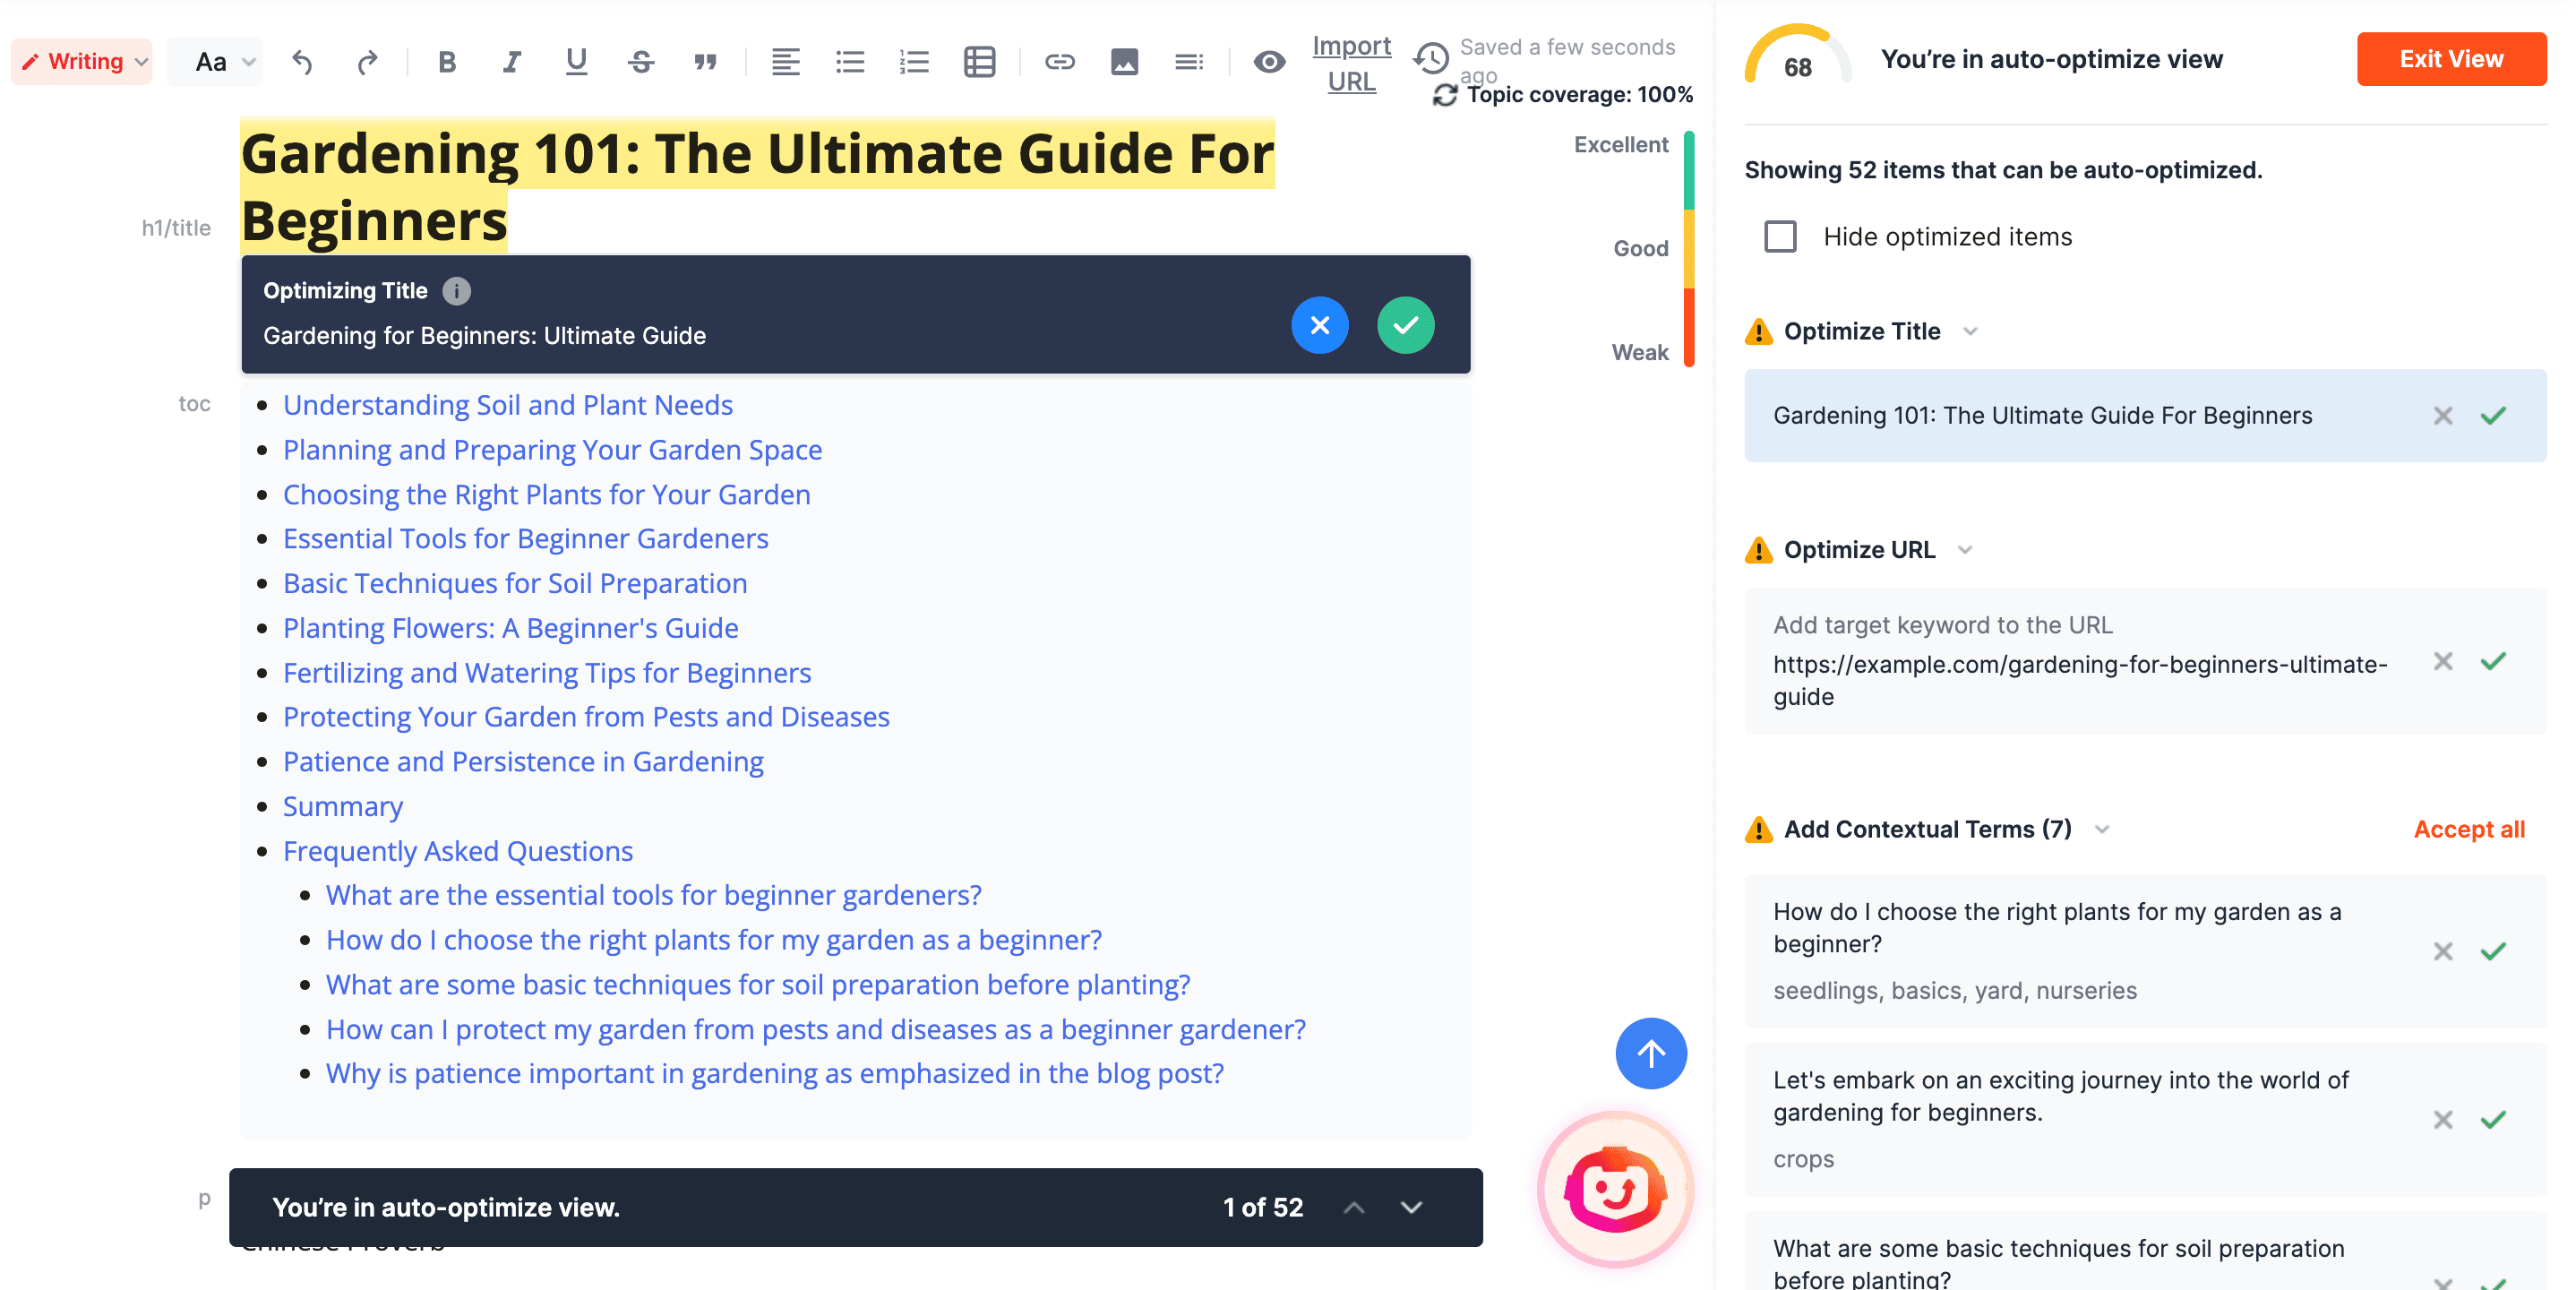
Auto Optimize
What’s best about SurgeGraph is that we don’t focus on only content (because that’s never enough). Being an SEO tool at our core, we highly emphasize on SEO-optimization to make sure your content can rank on search results.
SEO-optimization can be a tedious process, which is why we developed the Auto Optimizer to streamline and accelerate the whole process.
The Auto Optimizer analyzes your content for optimization opportunities, and at the click of a button, will automatically optimize your content based on best SEO practices.
To use the Auto Optimizer, head to the SEO tab and click “Auto Optimize”.
-
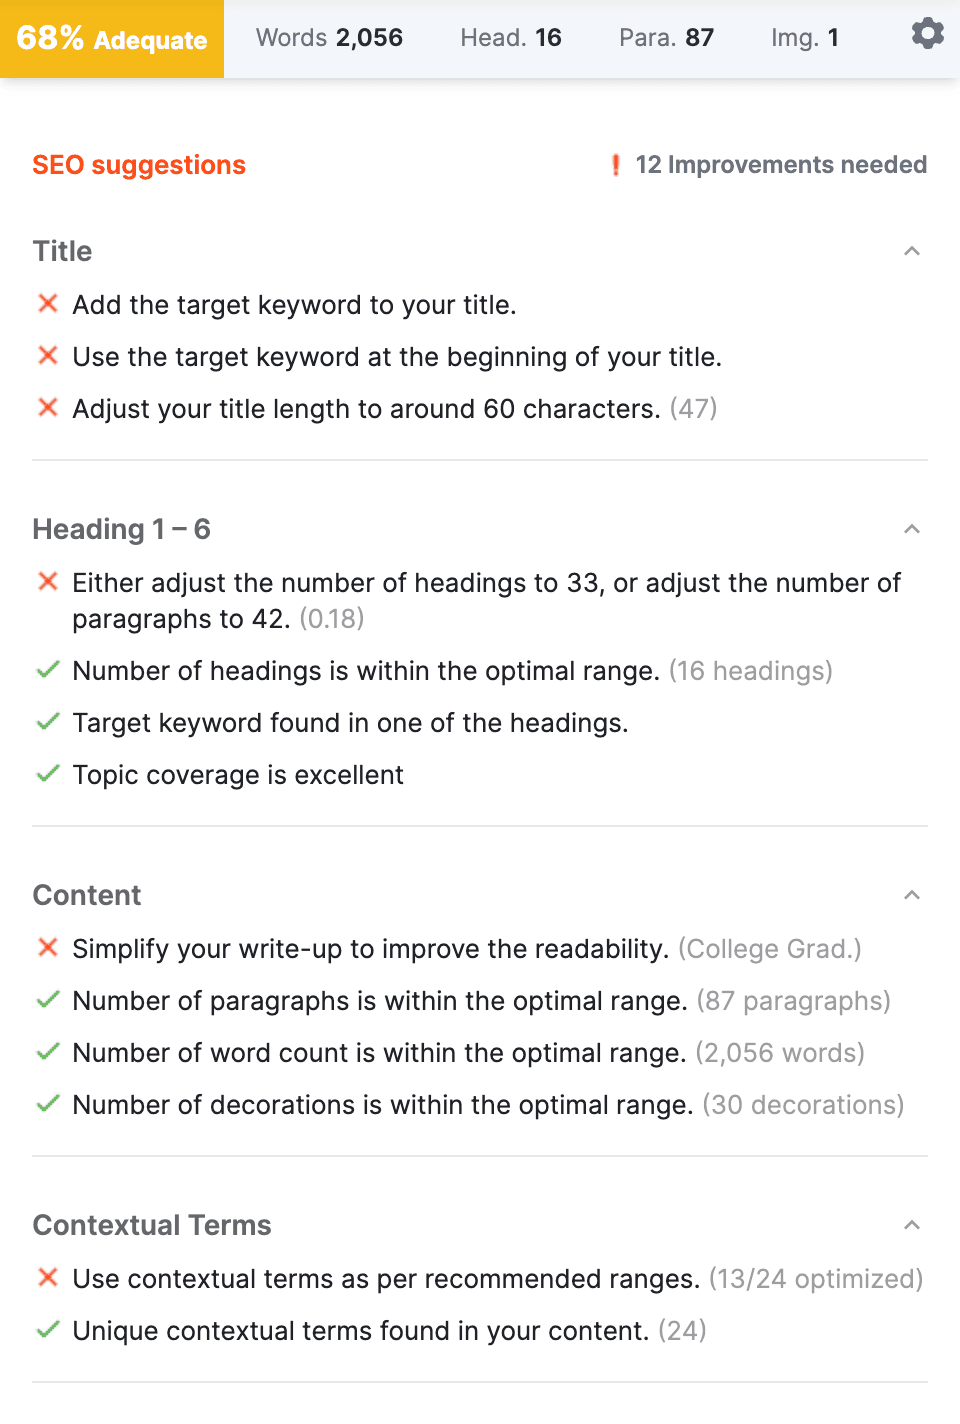
Follow the SEO suggestion checklist
While the Auto Optimizer is great, for now it can only automate some, but not all SEO items (we are working on adding more items). Hence, you will need to manually optimize the rest.
To ease this process for you, make sure to go to the SEO tab and scroll down to the SEO suggestions list.
This list serves as a guidance full of actionable items you can take to boost your SEO score. Check off as many items possible for a higher SEO score.
-
Generate a compelling meta description
Finally, generate a meta description using the Meta Description Generator.
Your meta description provides readers a snippet of what they can expect from your content, so you want to make sure it’s compelling and enticing enough to secure those clicks.
Step 6: Export & Publish
Once you’re happy with your article, there’s only step left: export and publish!
If you’re using WordPress, you can directly export the whole article to WordPress.
If you’re using a different CMS, you’d have to manually copy paste the whole article.
You can also download the content in HTML, DOCX, PDF, or TXT.

Automate Content Writing With SurgeGraph’s Longform AI Now!
Writing content doesn’t have to be so time-consuming and expensive anymore, if you have the right tool in your arsenal.
Instead of spending days of effort, you can easily get a 2,500 word article done in minutes.
Automate content writing with SurgeGraph’s Longform AI today: https://surgegraph.io.
FAQs
1. What type of articles can I generate using SurgeGraph’s Longform AI?
SurgeGraph’s Longform AI supports most types of articles and blog posts, including general articles, listicles, product roundups, reviews, and comparison posts.
2. How long does it take to generate a content?
On average, it takes around 3 minutes. However, this may vary as it depends on the article type, topic depth, length, and more.
3. There are too many steps to generate an article. Is there a more simplified process?
Absolutely. You can use the One-Click Generation feature which allows you to skip multiple steps when generate content. This saves you hours of time and effort, allowing you to focus on other aspects of your content creation strategy.
4. I have more questions. Who do I talk to?
Write to us at help@surgegraph.io.